
Getting started with Refunds
The Refunds feature enables businesses to automate and simplify the process of issuing customer refunds. Built on Lean’s existing payout infrastructure, it allows clients to initiate refunds seamlessly. The feature automatically identifies the connected Payout account and processes a reverse transaction, refunding the payment directly to its original source
Getting access to Refunds
To use the refunds feature, you need to have access to the following services:
- Payments: Refunds reverse customer payments processed through Lean Payments. The refunds are hence processed directly to the bank account connected with Lean while making the payment.
- Reconciliation: Refunds are only allowed for payments that have been successfully reconciled, ensuring funds that are received in your bank account are only refunded.
- Payouts:This enables Lean to process the refund by transferring the amount back to the customer's original payment source from the connected business account.
Ensure these features are enabled to streamline the refund process efficiently.
How does Refunds work ?
Lean's Refunds API allows you to initiate and manage refunds for payments processed through the Lean platform. The system supports:
- Full and partial refunds for reconciled payments
- Refunds to the source bank account
- Status tracking through the complete refund lifecycle
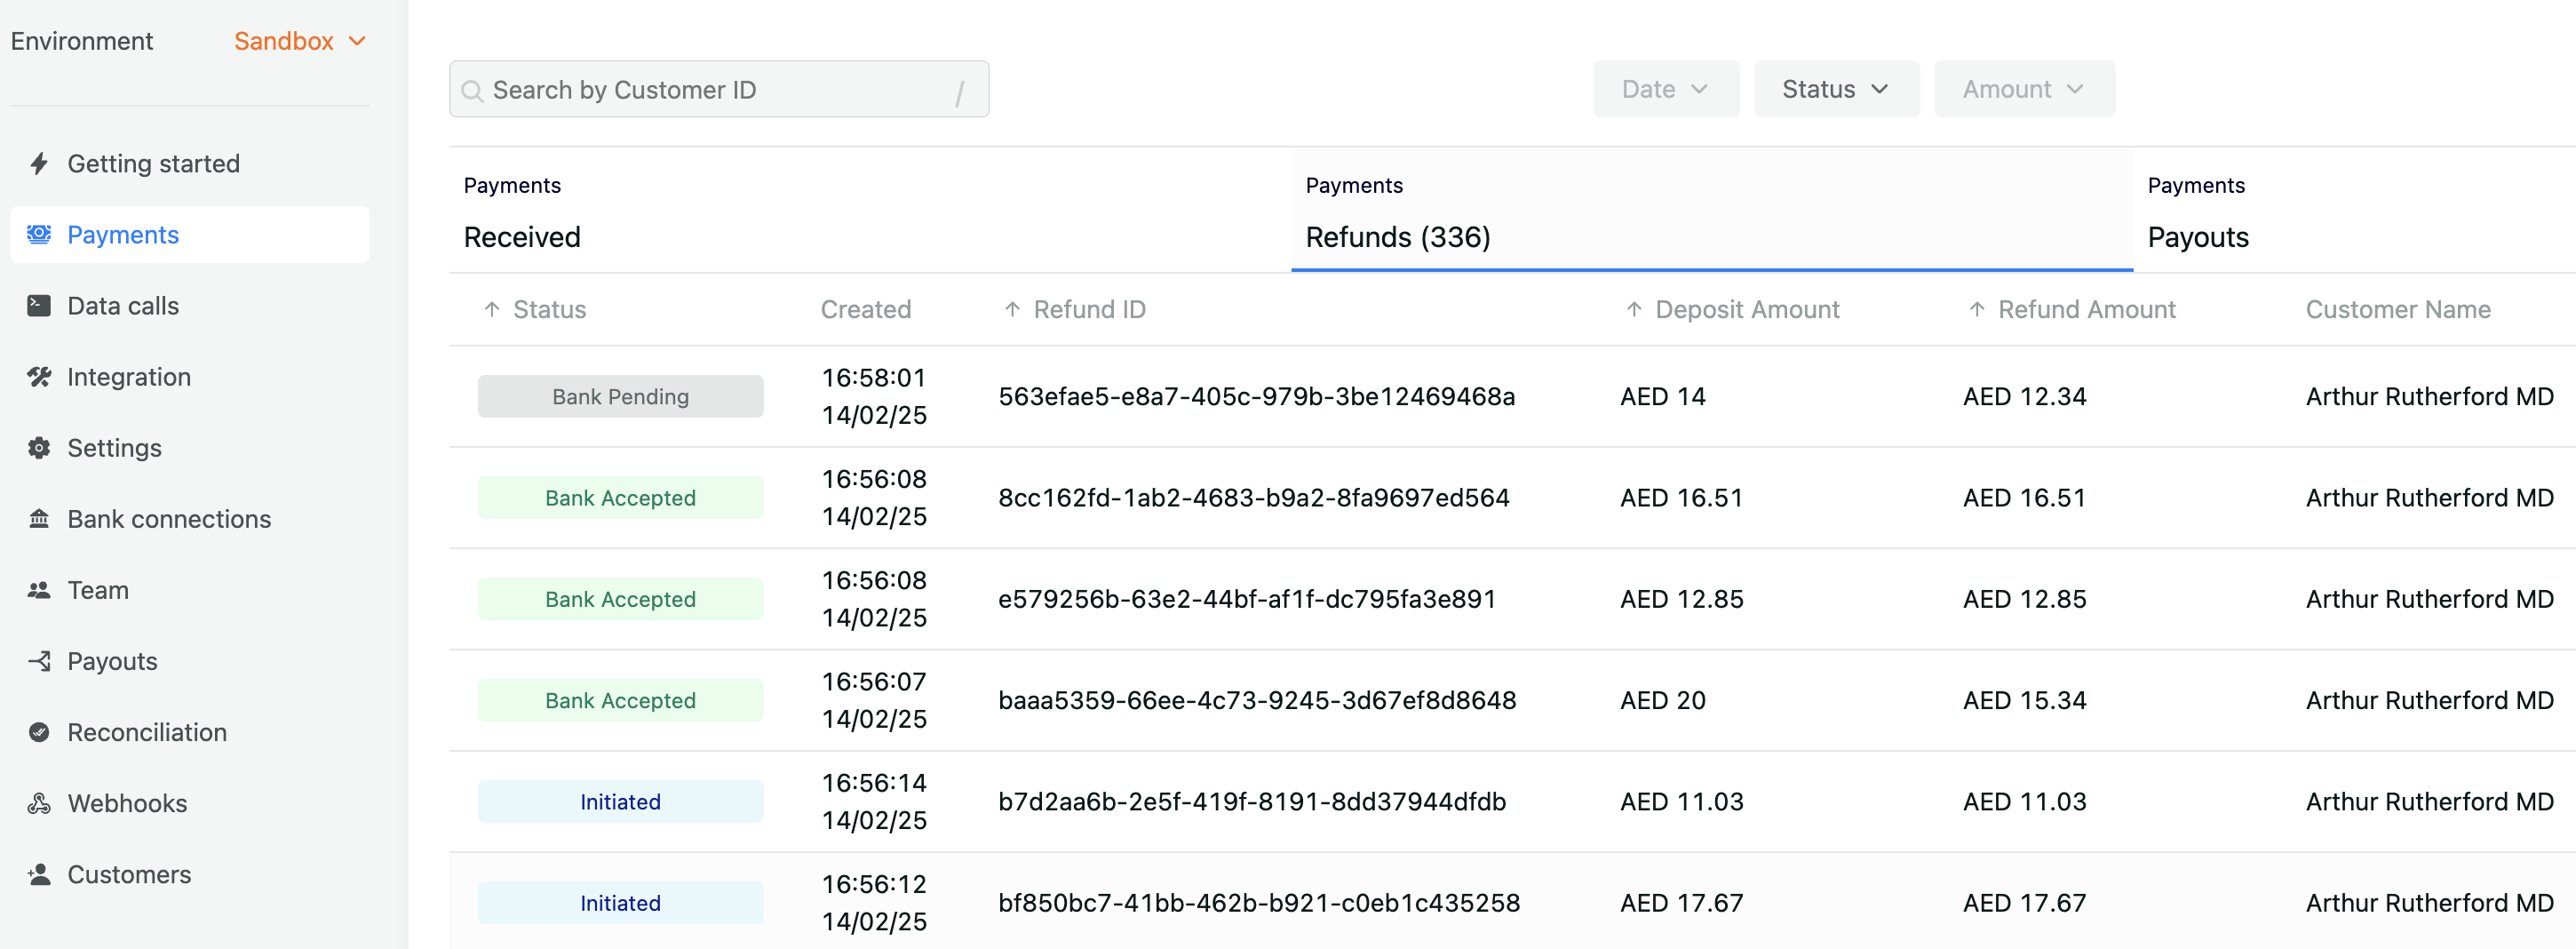
Creating Refunds from the Lean Application Dashboard
- Navigate to the Payments tab and locate the payment you wish to refund.
- Ensure the payment is reconciled, as refunds cannot be initiated for unreconciled payments. Click the three-dot menu and select "Refund".
Refunds are only available for transactions that have been reconciled. This ensures users cannot initiate refunds for payments that have not yet settled in the bank.
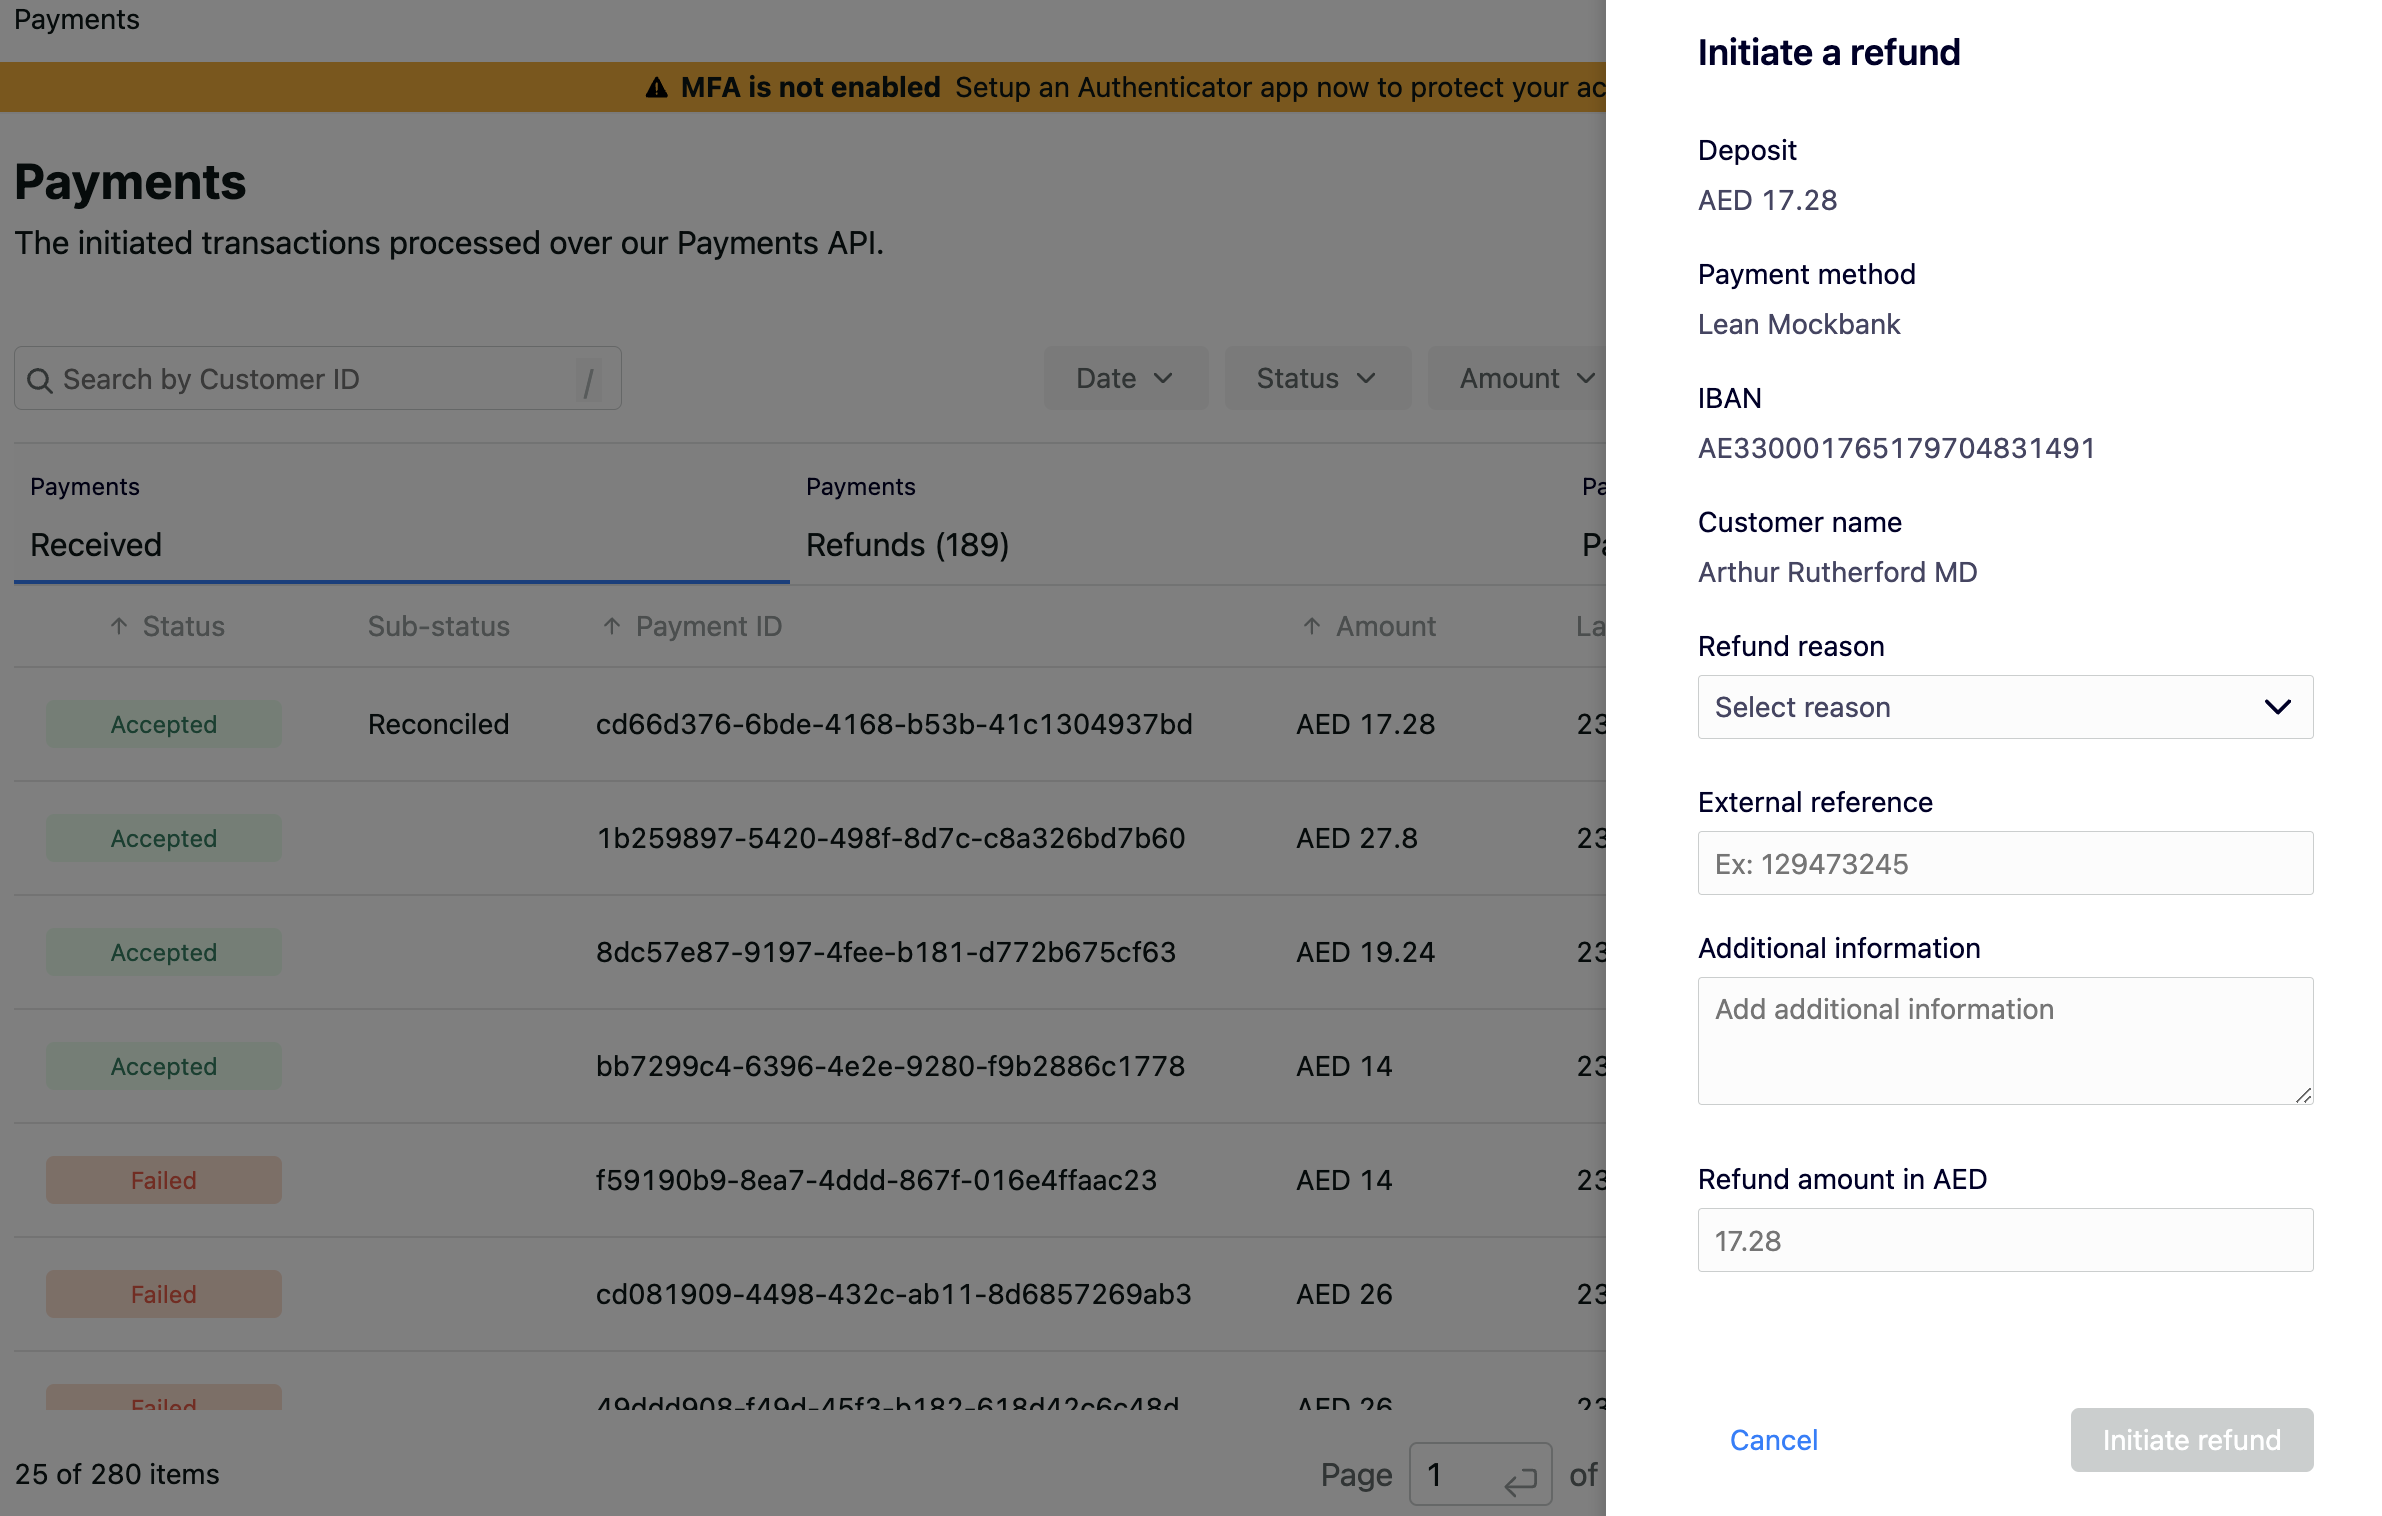
- Enter the required details, such as the refund reason, transaction reference, and refund amount, then click "Initiate Refund".
- Click "Refund" to process the refund, triggering a payout back to the original payment source.
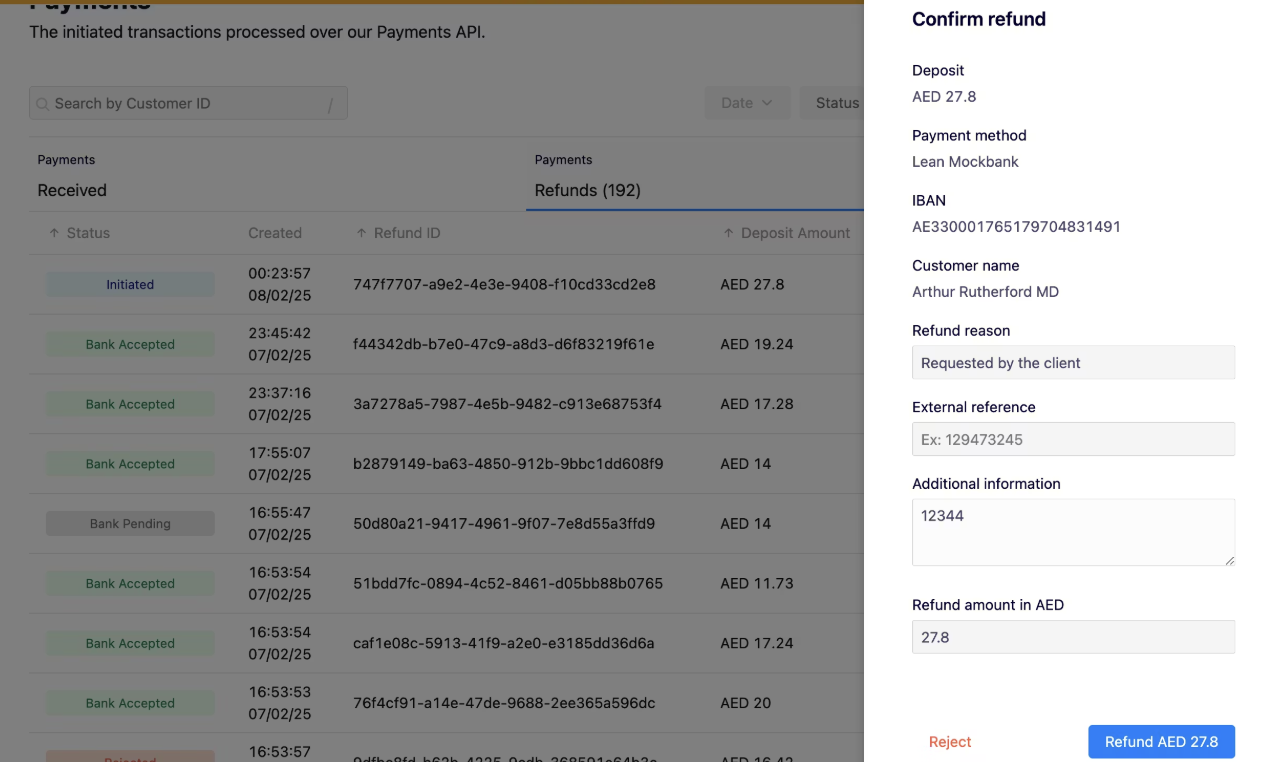
- Once the refund is confirmed , you can track the status of the refund transaction on the same screen. For more details on status please refer to Refunds lifecycle
The status of the queued refund can be tracked real-time on the same pageDetails of payment status can be found in Refunds Lifecycle
Creating Refunds via Lean APIs
Lean enables programmatic refunds through a simple API. Once a refund is created, Lean sends webhook events that reflect each stage of the refund lifecycle, allowing you to track progress, update customer records, and automate internal workflows.
Refund Lifecycle
A refund moves through the following stages:
- Created, Lean has accepted the refund request
- Processing, Lean is executing the refund
- Processed, funds have been successfully returned to the customer
You receive a webhook at each stage so you can update your internal system records.
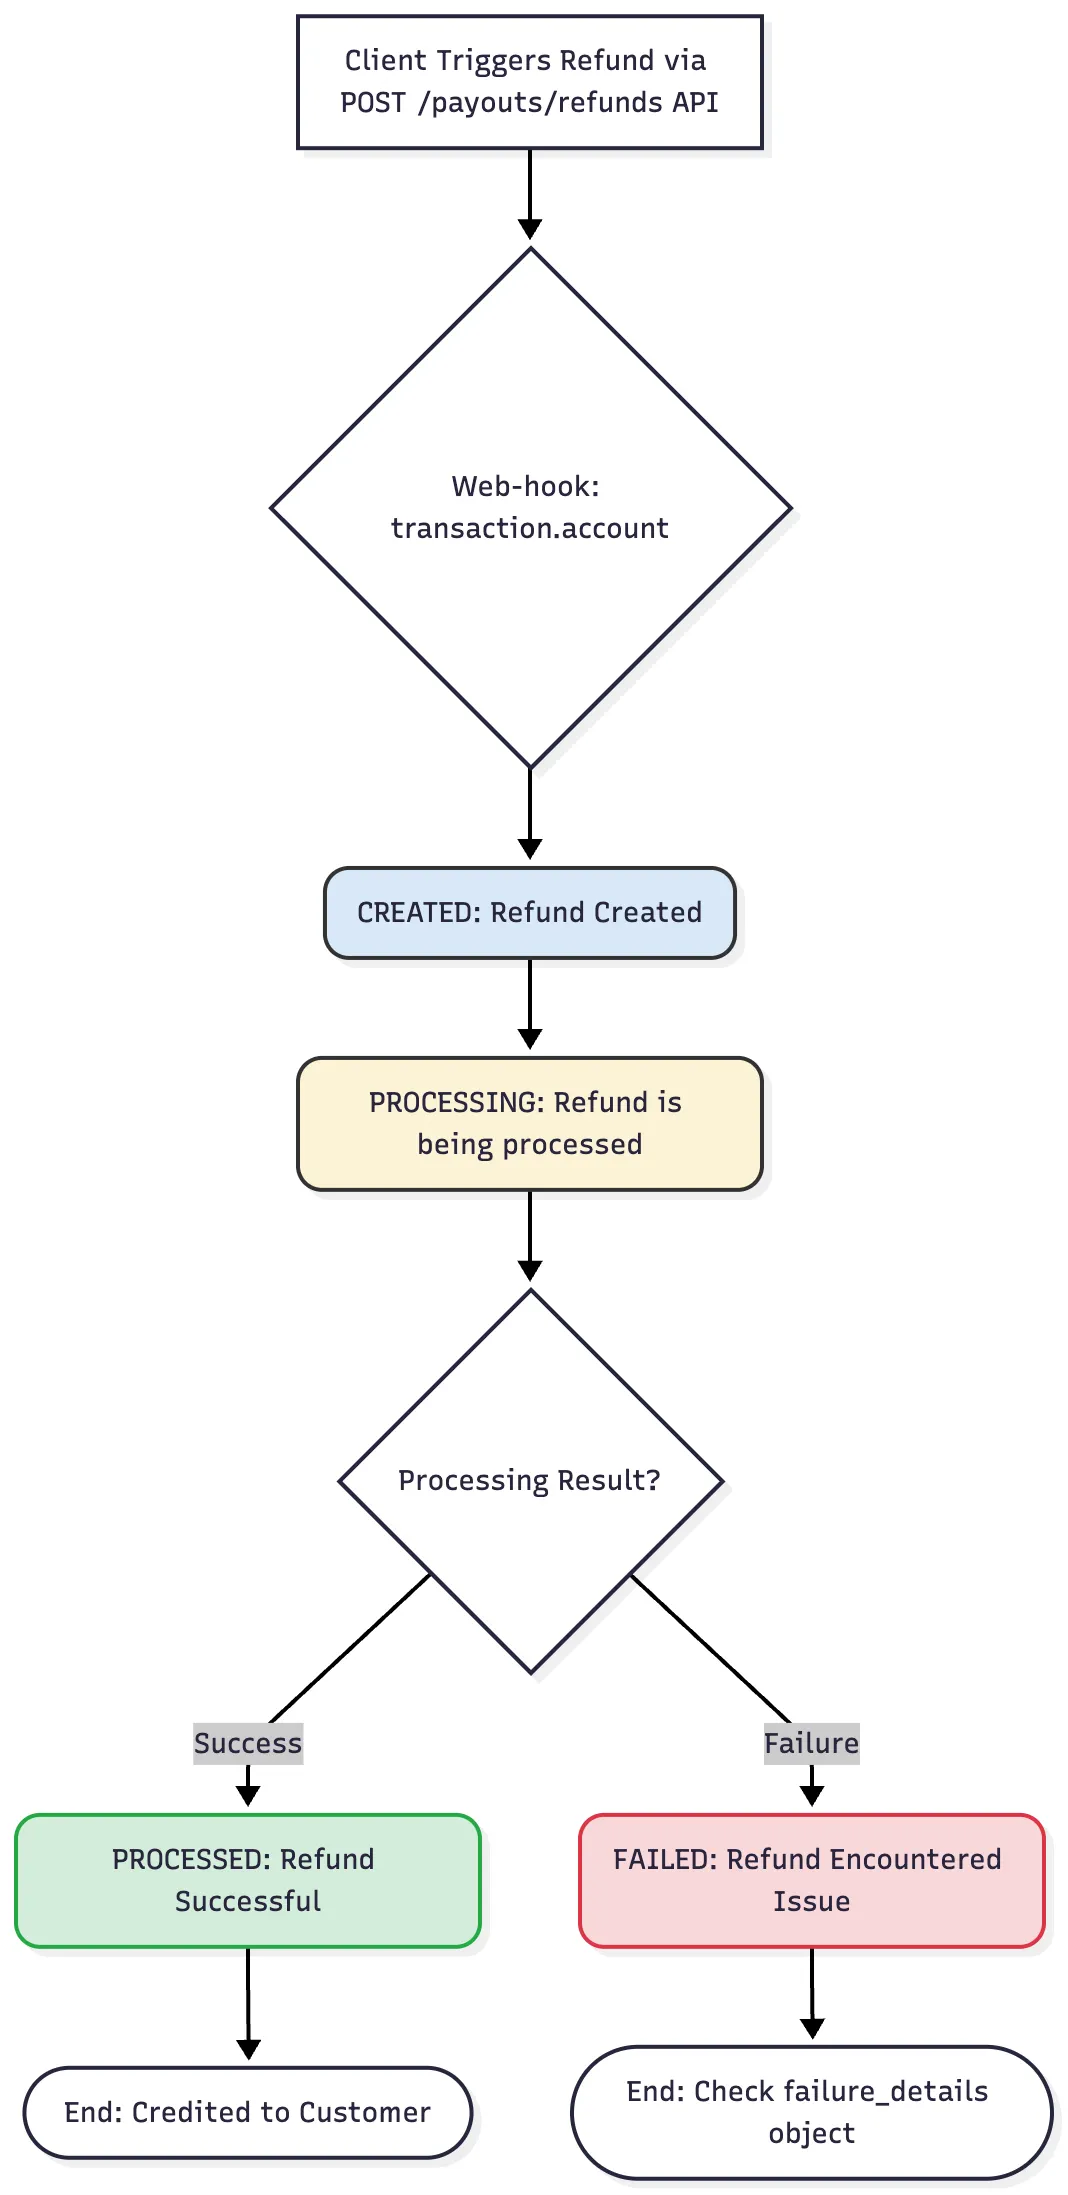
1. Create a Refund
To create a refund, you submit a POST request containing the original payment reference and refund details. The refund moves through several stages, each delivered to you via a webhook.
Initiate a new refund via API : POST /payouts/refunds
Example refund request body:
[
    {
        "payment_id": "dbd4dc89-f591-4152-8de7-b7d30a73d201",
        "amount": 15.34,
        "currency": "AED",
        "reason_code": "ORDER_CANCELLED",
        "description": "LAvJO#<l(M",
        "external_reference": "19hBjE",
        "status": "APPROVED"
    }
]
The “payment_id” must reference the original payment that you want to refund. Lean validates this link before processing the refund.
For the full parameter list and schemas, see the API reference doc
Reason code is mandatoryYou must supply a valid reason_code. Retrieve the available list using the Get Refund Reasons endpoint shown below.
To enter the reason code in the Create Refund Request, retrieve the reason codes from GET refunds reason endpoint
Get Refund Reasons
Retrieve available reason codes for refunds: GET /payouts/refunds/reasons
Example Response:
`[
    {
        "code": "CUSTOMER_REQUEST",
        "description": "Requested by the client"
    },
    {
        "code": "DUPLICATED_PAYMENT",
        "description": "Duplicated Payment"
    },
    {
        "code": "ORDER_CANCELLED",
        "description": "Service/Order Cancellation"
    },
    {
        "code": "FRAUDULENT_PAYMENT",
        "description": "Fraudulent Payment"
    }
]`
Reason codes may vary by region and use case. Always fetch the latest list dynamically instead of hard coding these values.
2. Receive Refund Status
After you create a refund, Lean sends webhook events to notify you of each status update. All refund webhooks use the transaction.account
To receive these events:
- Enable the transaction.account webhook in the Dev Portal
- Inform Lean Support or your Solution Engineer so they can activate webhook delivery for your application
Refunds progress through three main stages. You will receive a webhook each time the status changes.
Step 1) Created
This status indicates that the refund request was received but is not yet being processed.
Is this a final status? No, the refund will continue to progress.
Example payload:
 {
    "id": "123e4567-e89b-12d3-a456-426614174000",
    "application_id": "app_1234567890",
    "created_at": "2025-12-03T10:30:00Z",
    "last_updated_at": "2025-12-03T10:35:00Z",
    "status": "CREATED",
    "sub_status": "AWAITING_APPROVAL",
    "failure_details": null,
    "reference": "REF-2025-001234",
    "amount": {
      "currency": "AED",
      "amount": 150.55
    },
    "post_processing_operations": [],
    "type": "REFUND",
    "credit_indicator": "DEBIT",
    "account_id": "323e4567-e89b-12d3-a456-426614174002",
    "original_payment": {
      "account_transaction_id": "423e4567-e89b-12d3-a456-426614174003",
      "payment_id": "523e4567-e89b-12d3-a456-426614174004",
      "customer_id": "623e4567-e89b-12d3-a456-426614174005"
    },
    "description": "Refund for order ORD-2025-5678"
  }
Step 2) Processing
This status indicates that the refund has been approved and is now actively being processed by Lean and the receiving bank.
Is this a final status? No, the refund will move to the final Processed state.
Example payload:
  {
    "id": "123e4567-e89b-12d3-a456-426614174000",
    "application_id": "app_1234567890",
    "created_at": "2025-12-03T10:30:00Z",
    "last_updated_at": "2025-12-03T10:35:00Z",
    "status": "PROCESSING",
    "sub_status": "ACCEPTED",
    "failure_details": null,
    "reference": "REF-2025-001234",
    "amount": {
      "currency": "AED",
      "amount": 150.55
    },
    "post_processing_operations": [],
    "type": "REFUND",
    "credit_indicator": "DEBIT",
    "account_id": "323e4567-e89b-12d3-a456-426614174002",
    "original_payment": {
      "account_transaction_id": "423e4567-e89b-12d3-a456-426614174003",
      "payment_id": "523e4567-e89b-12d3-a456-426614174004",
      "customer_id": "623e4567-e89b-12d3-a456-426614174005"
    },
    "description": "Refund for order ORD-2025-5678"
  }
Step 3A) Processed
This status confirms that the refund has been completed and the customer has been credited. No further action is required.
Is this a final status? Yes, this is the final refund state.
Example payload:
  {
    "id": "123e4567-e89b-12d3-a456-426614174000",
    "application_id": "app_1234567890",
    "created_at": "2025-12-03T10:30:00Z",
    "last_updated_at": "2025-12-03T10:35:00Z",
    "status": "PROCESSED",
    "sub_status": null,
    "failure_details": null,
    "reference": "REF-2025-001234",
    "amount": {
      "currency": "AED",
      "amount": 150.55
    },
    "post_processing_operations": [],
    "type": "REFUND",
    "credit_indicator": "DEBIT",
    "account_id": "323e4567-e89b-12d3-a456-426614174002",
    "original_payment": {
      "account_transaction_id": "423e4567-e89b-12d3-a456-426614174003",
      "payment_id": "523e4567-e89b-12d3-a456-426614174004",
      "customer_id": "623e4567-e89b-12d3-a456-426614174005"
    },
    "description": "Refund for order ORD-2025-5678"
  }
Step 3B) Failed
Refund encountered issue and couldn’t be processed. Failure details should be visible in failure_details object.
Is this status final? Yes.
Example payload:
 {
    "id": "123e4567-e89b-12d3-a456-426614174000",
    "application_id": "app_1234567890",
    "created_at": "2025-12-03T10:30:00Z",
    "last_updated_at": "2025-12-03T10:35:00Z",
    "status": "FAILED",
    "sub_status": null,
    "failure_details": {
      "code": "BANK_ISSUE",
      "details": "Your bank is currently experiencing technical problems. Please try again later."
    },
    "reference": "REF-2025-001234",
    "amount": {
      "currency": "AED",
      "amount": 150.55
    },
    "post_processing_operations": [],
    "type": "REFUND",
    "credit_indicator": "DEBIT",
    "account_id": "323e4567-e89b-12d3-a456-426614174002",
    "original_payment": {
      "account_transaction_id": "423e4567-e89b-12d3-a456-426614174003",
      "payment_id": "523e4567-e89b-12d3-a456-426614174004",
      "customer_id": "623e4567-e89b-12d3-a456-426614174005"
    },
    "description": "Refund for order ORD-2025-5678"
  }
Common Issues
- Missing reason_code, Ensure you are passing a valid code from the Get Refund Reasons endpoint
- Webhooks not received, Confirm transaction.account type is enabled in the Dev Portal
- Refund stuck in Created, Your workflow may require approval, or the original payment may not be eligible for refund
Properties explanation
id- unique ID for a refund, equivalent of refund_idapplication_id- ID of your applicationcreated_at- time of creation of refund in Dubai timezonelast_udpated_at- time of last update of refund in Dubai timezonestatus- one of following:CREATED,PROCESSING,PROCESSED,FAILEDsub_status- optional of following:AWAITING_APPROVAL,ACCEPTED,PENDINGfailure_detailsobject containing following, it’s non null only when status isFAILED:code- error codedetails- error descriptionreference- bank transaction reference, ID returned by the bankamount- object containing following:currency- currency of refund transactionamount- value of refund transaction
account_id- Lean provided account ID from which refund was initiatedoriginal_paymentobject referencing to the original payment for which transaction was created, containing:account_transaction_id- unique ID which will point the original reconciled transactionpayment_id- original payment IDcustomer_id- customer which made original payment
description- description provided by client which was passed to the bank
Updated 6 months ago