How to initiate Corporate Payments
How does the Corporate Payments API work?
The Corporate Payment product can be broken down into 2 flows:
First, a payment needs to be queued through Lean by a Maker. A Maker is typically a person that queues payments into your system.
Then, payments need to be authorized through Lean by an Authorizer. An Authorizer (or Checker) is a person that authorizes payments that have been queued through Lean.
We will be using the terms Maker and Authorizer throughout this guide.
Queueing a Payment:
-
Setup a Payment Destination and a Customer
-
Create an End-User for that Customer
For Corporates, in the first flow, the End-User is generally a “Maker”, which is typically a person that can queue payments into your payments system; so that someone else can authorize it.
-
Login & Create a Payment Source
This step creates an authorisation link between your customer’s bank account and your Lean account.
-
Create a Payment Intent
In this step, you would be creating a 'contract' between Lean and your Application for the value you want to transfer between accounts.
-
Initiate a Payment
Your user confirms the amount they want to transfer from their account to your account, and the payment is queued for the Authorizer to accept/reject it.
Authorizing a Payment:
-
Create an End-User
For Corporates, in the second flow, the End-User is generally an “Authorizer”, which is the person that can fetch the queued payments, and authorizes the ones they want. You would create an End-User for the same Customer (Corporate/Business) of the First flow.
-
Login
Enable the Authorizer to login to their bank account (with their credentials) through your application
-
Fetch Queued Payments
Allow the Authorizer to fetch all Pending Authorizations queued at the Bank for approval/rejection
-
Authorize Payments
Your end-user confirms the payments they want to approve from their account to your or another account, and the payments are processed
Queueing a Payment
1. Setup a Payment Destination and a Customer
Create Destination
A Destination is a bank account that you want your customer to be able transfer money into.
If you want a default destination set-up for your platform (i.e route funds to one main account), please reach out to your Lean representative.
Alternatively, you can create a Destination for every payment you submit, if the receiver is different depending on your invoices for example.
Create Customer
This creates a relationship between your application, customers and all the services they consume within Lean into a single object.
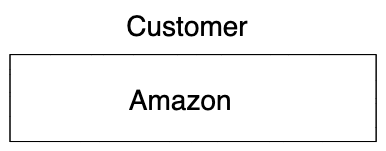
On the Corporate Flow, your customer is generally another business - e.g: Amazon
Endpoint: https://sandbox.leantech.me/customers/v1/
POST Response from Customer API:
{
    "id": "775cfd5a-a3db-49b3-a993-7760fca556f8",
    "app_user_id": "Amazon"
}
2. Create an End-User for that Customer
Create End-User
Once you create your Customer, you will need to assign it end-users. An end-user is an employee of the customer you are onboarding on your platform. They are responsible for queueing, authorising (or both) payments through Lean on your platform.
POST Request from End-User API:
Endpoint: https://sandbox.leantech.me/customers/v1/end-users
{
    "customer_id": "775cfd5a-a3db-49b3-a993-7760fca556f8",
    "reference": "georgy_maker"
}
POST Response from End-User API:
{
    "id": "7b7be8b9-feb7-41ee-93ce-73cd9572bf8f",
    "customer_id": "775cfd5a-a3db-49b3-a993-7760fca556f8",
    "reference": "georgy_maker"
}
Thus, we have created an end-user (Georgy) for our customer (Amazon).
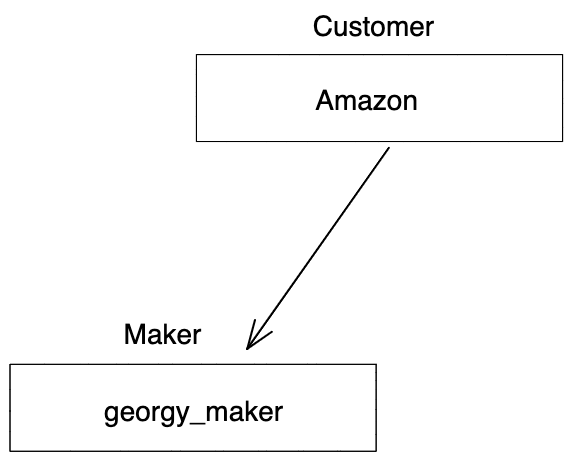
End User creation shot
3. Login & Create a Payment Source
In order for your customer to be able to queue and approve a payment, first they need to authorize their bank to queue payments and transfer funds through your app. This process will add their Bank Account as a Payment Source in your App.
If you want to route the funds of your customers’ transactions to your account, you can optionally add yourself as a Beneficiary during this process. This action will ensure that you are setup as a Recipient in your customer’s bank account.
On your Front-end, make a .connect() call to the LinkSDK to guide your user through the process of connecting their bank account to your app and to optionally specify a destination to be added as a beneficiary. For further information on integrating the LinkSDK into your platform please see the LinkSDK integration documentation at https://docs.leantech.me/docs/web
For the purposes of this guide we will be using Javascript as the language being used by the front-end.
// page.html
<button onClick={() => cps(...params)}>Set up payments</button>

// script.js
function cps(customer_id) {
  Lean.connect({
    app_token: "YOUR_APP_TOKEN",
    customer_id: "e52d8b7e-7c4d-40af-b851-90ab5c061028",
    end_user_id: "7b7be8b9-feb7-41ee-93ce-73cd9572bf8f",
    payment_destination_id: "266733cc-6f46-4e87-af7e-9bb46b99601d",
    permissions: [ "identity","balance","accounts","transactions","payments"],
    sandbox: false,
  })
}
For now, you will have to submit both the data & payments permission in the connect() method, even if you’re using the payments product only.
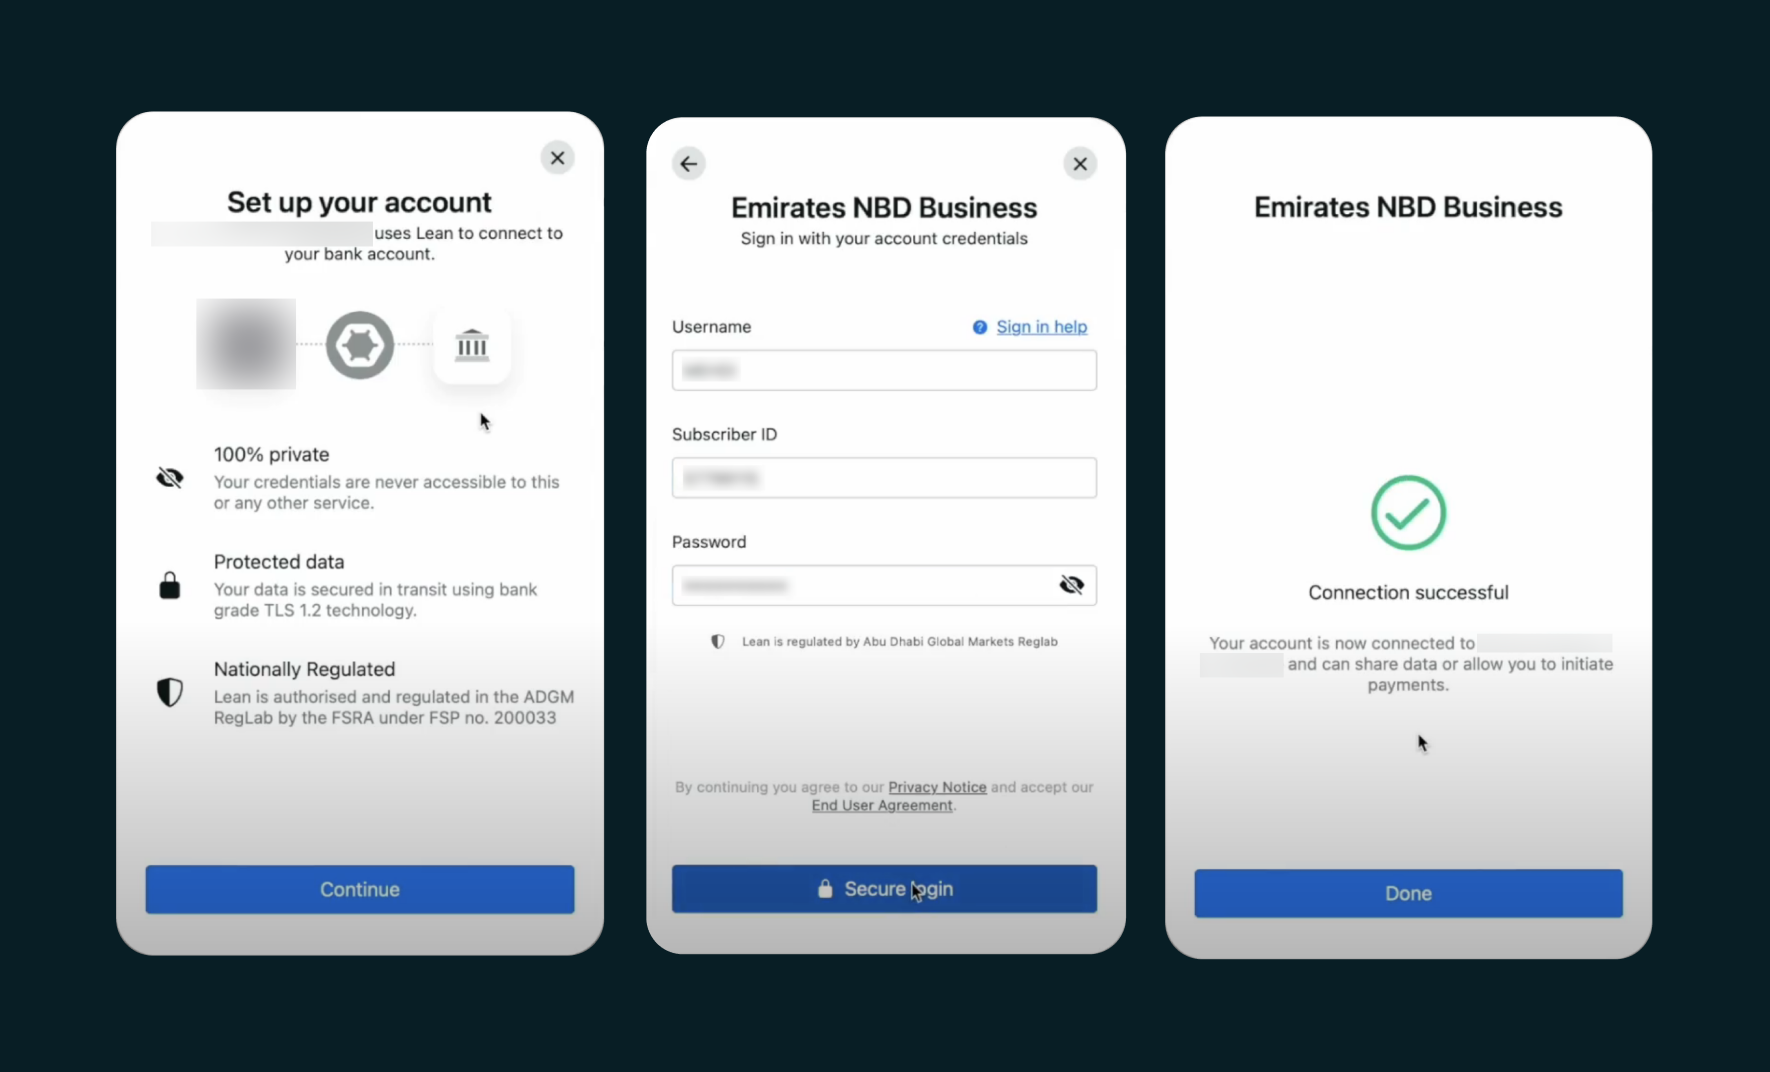
When a customer completes the LinkSDK - please note, no details are shared directly from the SDK to your front-end.
A Success, Error or Cancelled message can be returned from the SDK via a callback (depending on the platform you're integrating with) in the following format:
{
    "status": "SUCCESS",
    "method": "CREATE_PAYMENT_SOURCE",
    "message": "Customer created Payment Source successfully"
}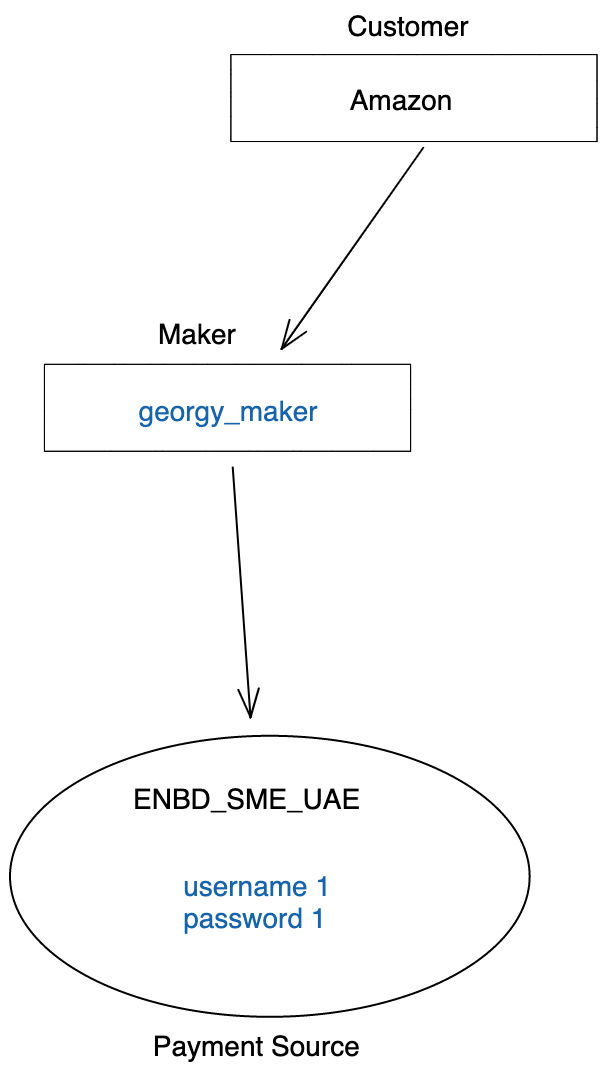
Payment Source creation shot
The details of your newly created entity will instead be sent via a webhook to your backend services.
Payment Source Web-hook
When a customer creates a Payment Source using the LinkSDK, your backend will receive two or three webhooks:
entity.createdpayment_source.createdpayment_source.beneficiary.created(optionally, if you added apayment_destination_idduring the payment source creation in theconnect()method
The entity.created webhook will look like this:
{
  "payload": {
    "id": "41011f6c-d96c-3458-8eb7-de46a1c9825d",
    "customer_id": "61c8db3f-a078-4c75-a3a8-954b585ff945",
    "end_user_id": "7b7be8b9-feb7-41ee-93ce-73cd9572bf8f",
    "app_user_id": "Georgy",
    "permissions": ["transactions", "balance", "identity", "accounts", "payments"],
    "bank_details": {
      "name": "Lean Mock Bank Business",
      "identifier": "LEANMB2",
      "bank_type": "SME",
      "logo": "https://cdn.leantech.me/img/banks/white-lean.png",
      "main_color": "#06357A",
      "background_color": "#ffffff"
    }
  },
  "type": "entity.created",
  "message": "An entity object has been created.",
  "timestamp": "2022-06-28T14:08:48.686741Z",
  "event_id": "c2985081-8add-48a5-8df0-ada5f71dcce3"
}
The payment_source.created webhook will look like this:
{
  "payload": {
    "id": "41011f6c-d96c-3458-8eb7-de46a1c9825d",
    "customer_id": "61c8db3f-a078-4c75-a3a8-954b585ff945",
    "end_user_id": "7b7be8b9-feb7-41ee-93ce-73cd9572bf8f",
    "status": "ACTIVE",
    "bank_identifier": "LEANMB2",
    "bank_name": "Lean Mock Bank Business"
  },
  "type": "payment_source.created",
  "message": "A payment source was pre-authorized by your customer.",
  "timestamp": "2022-07-07T14:36:08.847459Z",
  "event_id": "f3d36a47-5cf4-4813-b6a5-54678ba3ac2b"
}
The payment_source.beneficiary.created webhook will look like this:
{
  "payload": {
    "id": "947a6558-4c9f-410a-ad18-868b4e39a095",
    "customer_id": "e52d8b7e-7c4d-40af-b851-90ab5c061028",
		"end_user_id": "7b7be8b9-feb7-41ee-93ce-73cd9572bf8f",
    "payment_source_id": "41011f6c-d96c-3458-8eb7-de46a1c9825d",
    "payment_destination_id": "266733cc-6f46-4e87-af7e-9bb46b99601d",
    "status": "ACTIVE"
  },
  "type": "payment_source.beneficiary.created",
  "message": "A beneficiary was added for a payment source.",
  "timestamp": "2022-07-07T14:36:08.773057Z",
  "event_id": "9f8e8f41-e514-4575-a67a-6eb131ffac1c"
}
You will notice that the entity_id and payment_source_id are equal.
Fetch the Payment Source
Using the id in the payload from the web-hook from entity or payment_source, fetch the newly created Payment Source and save it to your database:
GET on the Payment Source:
https://api.leantech.me/customers/v1/61c8db3f-a078-4c75-a3a8-954b585ff945/payment-sources/41011f6c-d96c-3458-8eb7-de46a1c9825d
GET Response on the Payment Source:
{
    "id": "41011f6c-d96c-3458-8eb7-de46a1c9825d",
    "customer_id": "61c8db3f-a078-4c75-a3a8-954b585ff945",
    "app_id": "2fce1bef-5416-4d6b-b345-ce3fd3cc92d3",
    "bank_identifier": "LEANMB2",
    "status": "ACTIVE",
    "beneficiary_cool_off_expiry": null,
		"end_users": [
				{
					 "id": "7b7be8b9-feb7-41ee-93ce-73cd9572bf8f"
				}

		],
    "accounts": [
        {
            "id": "f2698d9f-83d9-44c0-ae33-7820813ab48e",
            "account_id": "df2381de-c24e-4919-a6e9-95a3ee4652ff",
            "account_name": "LEAN TECHNOLOGIES LTD",
            "account_number": "100000065391",
            "iban": "AE690260000515779911501",
            "balance": 100818.86,
            "currency": "AED",
            "balance_last_updated": "2022-07-07T14:36:08.763529Z"
        },
        {
            "id": "cb33c19f-8291-472c-bbf6-d0a8df9c09c8",
            "account_id": "32e08407-aba7-4e00-9f3f-7c09b24c76c1",
            "account_name": "LEAN TECHNOLOGIES LTD",
            "account_number": "100000065392",
            "iban": "AE420260000515779911502",
            "balance": 383.46,
            "currency": "USD",
            "balance_last_updated": "2022-07-07T14:36:08.763532Z"
        }
    ],
    "beneficiaries": [
        {
            "id": "947a6558-4c9f-410a-ad18-868b4e39a095",
            "payment_destination_id": "60c1a2ee-271c-4e63-9558-caac36697690",
            "status": "ACTIVE",
            "beneficiary_cool_off_expiry": "2022-07-07T14:36:08.770112Z",
            "bank_identifier": "LEANMB3"
        }
    ]
}
4. Create a Payment Intent
Now that your user has a Payment Source - the next step is to create a Payment Intent.
A Payment Intent is a back-end to back-end call that highlights the customer, destination, amount and currency that will be used for the payment initiation.
The destination_id is the recipient of your payment. If your customer is paying you, then you would add your default destination here. If your customer is paying another business, you would have to create a new destination for the receiving business, and use this destination in the payment intent API body.
The returned payment_intent_id should be used in the next step to queue the payment.
POST Request from Payment Intent API:
curl -X POST 'https://sandbox.leantech.me/payments/v1/intents' \
    --header 'Content-Type: application/json' \
  --header 'lean-app-token: YOUR_APP_TOKEN' \
    --data-raw '{
        "amount": 1000,
        "currency": "AED",
        "payment_destination_id": "60c1a2ee-271c-4e63-9558-caac36697690",
        "customer_id": "61c8db3f-a078-4c75-a3a8-954b585ff945",
        "description": "can be used for reconciliation"
    }'
POST Response from Payment Intent API:
{
    "payment_intent_id": "9dafc6f5-37e8-4f72-aa0b-5323c0935c5f",
    "customer_id": "61c8db3f-a078-4c75-a3a8-954b585ff945",
    "amount": 1000.00,
    "currency": "AED",
    "payments": [],
    "payment_destination": {
        "id": "60c1a2ee-271c-4e63-9558-caac36697690",
        "bank_identifier": "LEANMB3",
        "name": "XXXXXX",
        "iban": "AEXXXXXXXXXXXXXXXX",
        "display_name": "XXXXXXX",
        "account_number": "XXXXXXXX",
        "swift_code": "BBMEAEAD",
        "status": "CONFIRMED",
        "address": "1234 1234",
        "country": "ARE",
        "city": "Dubai",
        "default": true
    }
}
5. Initiate a Payment
POST Request from Initiate Payment API:
Use the pay() method on the Link SDK to initiate the payment.
  function pay() {
      Lean.pay({
        app_token: "YOUR_APP_TOKEN",
        payment_intent_id: "9dafc6f5-37e8-4f72-aa0b-5323c0935c5f",
        end_user_id: "7b7be8b9-feb7-41ee-93ce-73cd9572bf8f",
        sandbox: true,
        callback: "cb",
      });
    }
Once an initiation has been completed, you will receive a payment.created web-hook to your Webhook URL:
{
  "payload": {
    "id": "81f686b5-0cf3-4ee1-9250-9f8dae030a1d",
    "customer_id": "61c8db3f-a078-4c75-a3a8-954b585ff945",
    "end_user_id": "7b7be8b9-feb7-41ee-93ce-73cd9572bf8f",
    "intent_id": "88f73a6d-f017-4fc6-85bf-2cc2804c2a4a",
    "status": "AWAITING_AUTHORIZATION",
    "amount": 1000,
    "currency": "AED",
    "bank_transaction_reference": "1110607221744685"
  },
  "type": "payment.created",
  "message": "A payment object has been created.",
  "timestamp": "2021-03-24T12:50:47.521324Z",
  "event_id": "0a44fb49-2273-48e1-ba47-1c1e4d590cce"
}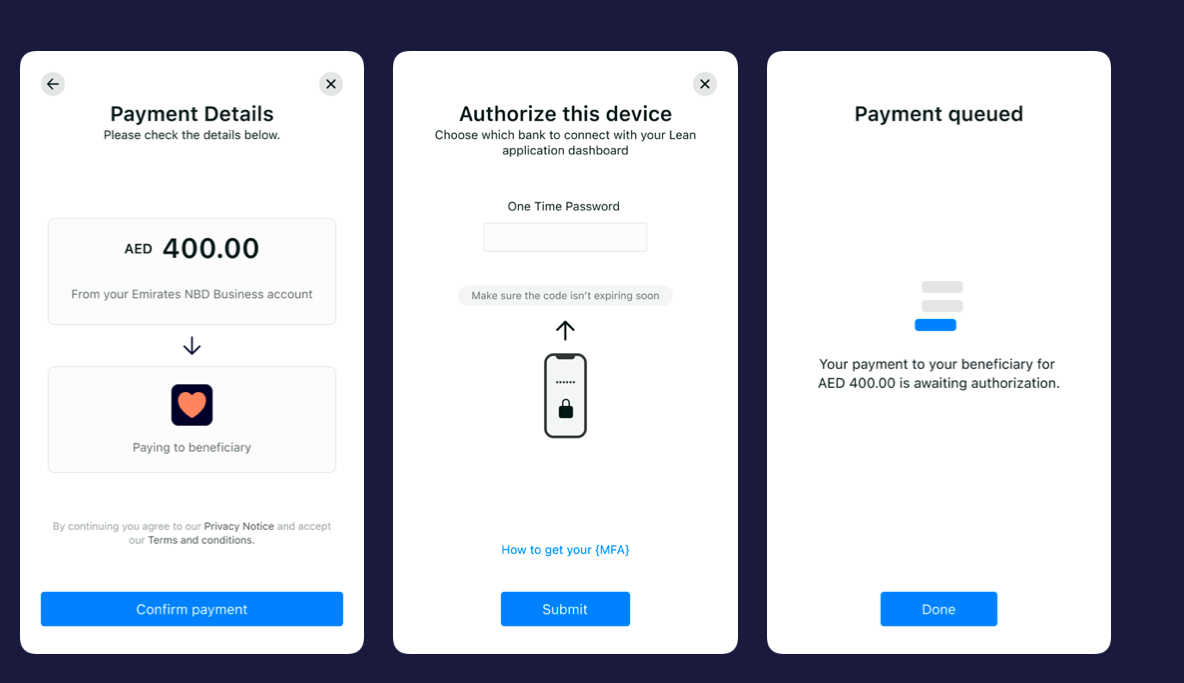
Initiate creation shot
Payment Initiations will have one of the 2 final statuses for queueing:
FAILED: The bank rejected the payment initiation. This could be for a number of reasons such as insufficient balance to complete the transaction, or a connectivity failure.
AWAITING_AUTHORIZATION: The bank accepted the order and the payment was queued successfully.
Authorizing a Payment
Allow the payment to be enqueued in the banking portal by adding a time delayWe recommend adding a delay of 5 minutes between a successful enqueueing and authorization of a payment. This will ensure that the payment has reached the correct status in the bank!
Please note: Not every corporate bank account operates with the Maker/Authorizer model. You will need to ask your customer how their corporate bank account is set up.
- Option 1: The account requires no authorizer. This means the End-User you have created before can be used to authorize queued payments.
- Option 2: The account requires a maker to queue a payment and a different user, the authorizer, to approve payments. For this case follow the guide below to connect a 2nd End-User to your customer and have them authorize the payment.
1. Create an End-User for your Authorizer
Create another End-User for your Authorizer.
This is a similar step as the one mentioned on Step 2 of Queueing a Payment.
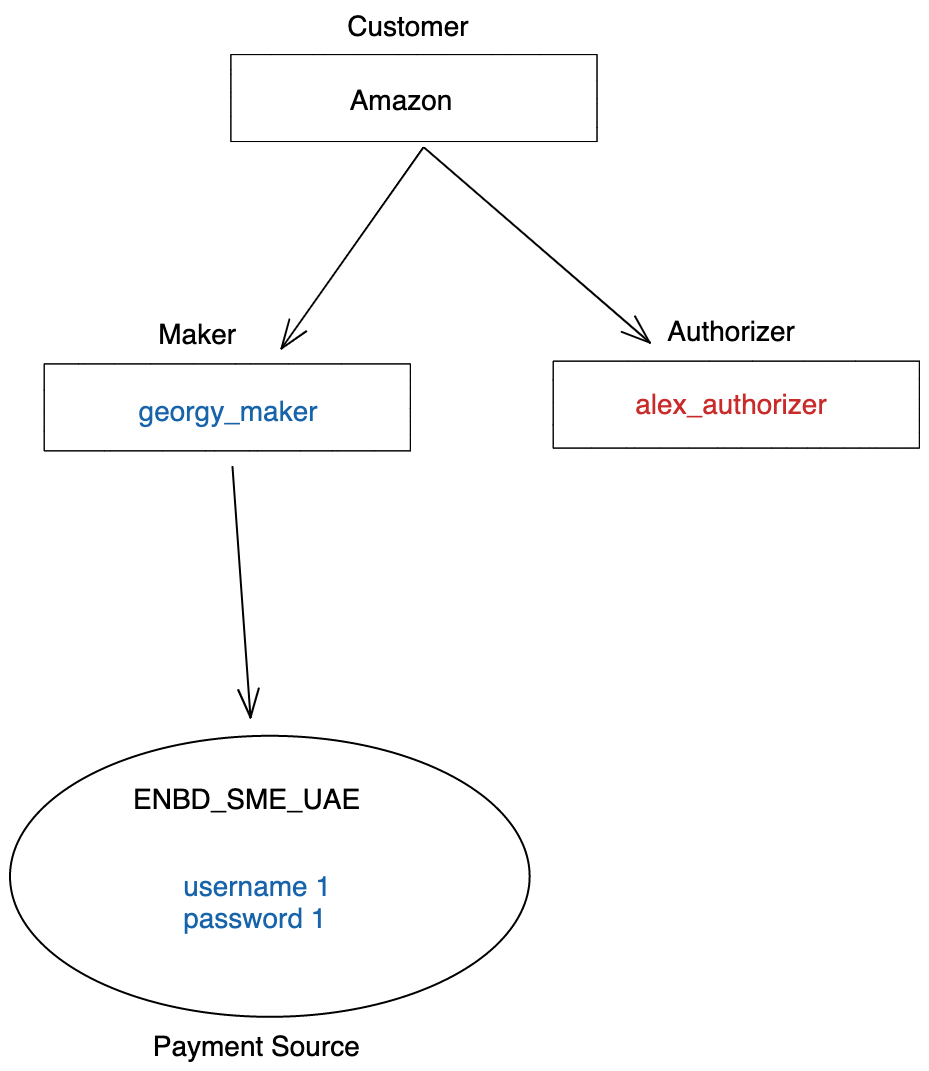
Second End User creation shot
2. Connect a second user
Assuming you already created another end-user for your customer, they will need to login on their bank account (same bank account as the Maker in the first flow) with their own (different) credentials.
Login Request on Link SDK:
// page.html
<button onClick={() => cps(...params)}>Set up payments</button>

// script.js
function cps(customer_id) {
  Lean.connect({
    app_token: "YOUR_APP_TOKEN",
    "customer_id": "e52d8b7e-7c4d-40af-b851-90ab5c061028",
    "end_user_id": "8a8ad9a7-feb7-41ee-93ce-73cd9572ae7e",
    "payment_destination_id": "266733cc-6f46-4e87-af7e-9bb46b99601d",
      permissions: [ "identity","balance","accounts","transactions","payments"],
      sandbox: false,
  })
}
Given this end_user shares the same customer_id as the Maker, and is logging in the same bank, we would append the new end_user_id in the previously created entity for the same customer and Bank Account.
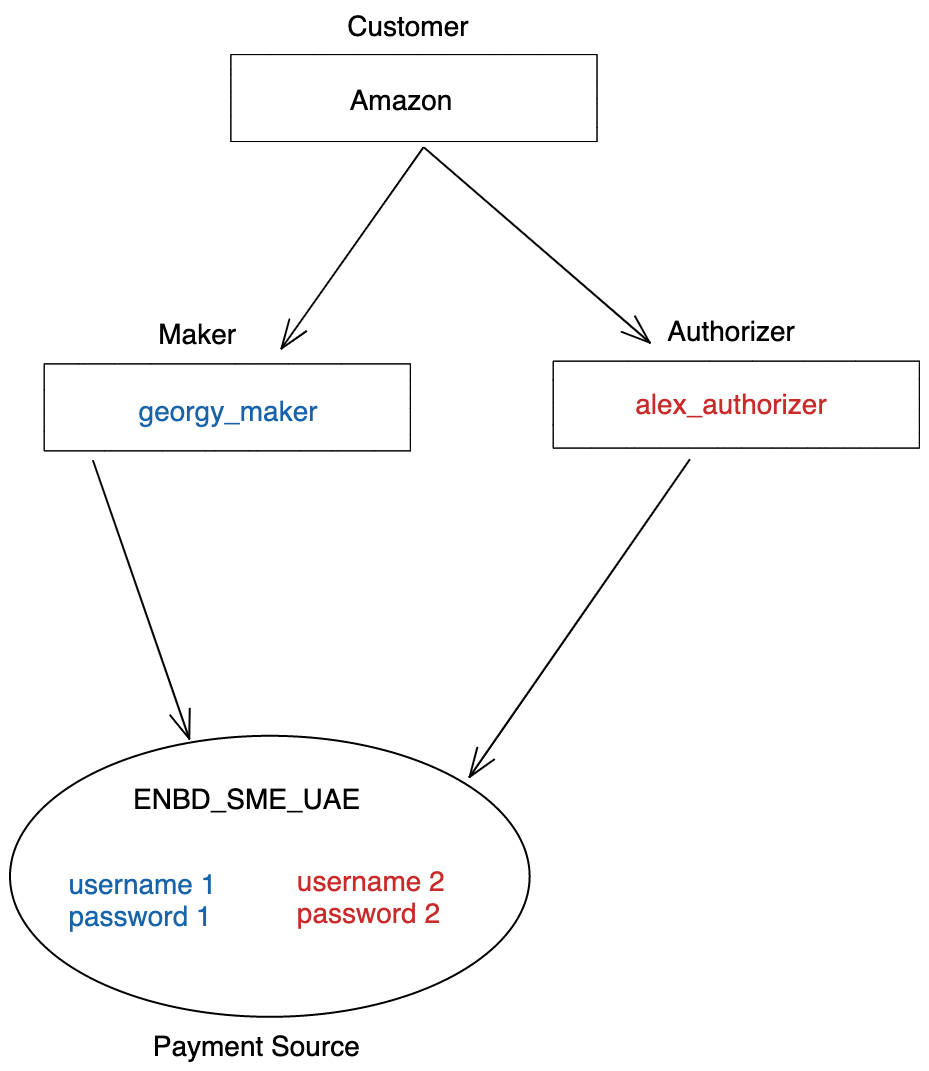
Payment Source Two creation shot
The entity.updated webhook will look like this:
{
  "payload": {
    "id": "41011f6c-d96c-3458-8eb7-de46a1c9825d",
    "customer_id": "61c8db3f-a078-4c75-a3a8-954b585ff945",
    "end_user_id": "8a8ad9a7-feb7-41ee-93ce-73cd9572ae7e",
    "app_user_id": "Amazon",
    "permissions": ["transactions", "balance", "identity", "accounts", "payments"],
    "bank_details": {
      "name": "Lean Mock Bank Business",
      "identifier": "LEANMB2",
      "bank_type": "SME",
      "logo": "https://cdn.leantech.me/img/banks/white-lean.png",
      "main_color": "#06357A",
      "background_color": "#ffffff"
    }
  },
  "type": "entity.updated",
  "message": "An entity object has been updated.",
  "timestamp": "2022-06-28T17:12:36.686741Z",
  "event_id": "b3875081-8add-48a5-8df0-ada5f71dbcd4"
}
3. Fetch Queued Payments
After having logged into their bank account, the end-user will now be able to fetch all the pending authorizations from the Bank, that need to be reviewed before being sent for processing.
GET payments/v1/customers/{customerId}/queued-payments
The result of this call will be an array of payments intents that do not have a terminal Lean status, upon success.
This API call will only show the payment intents that have been queued through Lean, and that are not in FAILED, PENDING_WITH_BANK and ACCEPTED_BY_BANK
4. Authorize Payments
Use the authorize() method on the Link SDK to authorize the payment.
function authorisePayment() {
      Lean.authorize( {
        app_token: "YOUR_APP_TOKEN",
        payment_intent_ids: ["88f73a6d-f017-4fc6-85bf-2cc2804c2a4a"],
        customer_id: "61c8db3f-a078-4c75-a3a8-954b585ff945",
        end_user_id: "8a8ad9a7-feb7-41ee-93ce-73cd9572ae7e",
        sandbox: true
      });
    }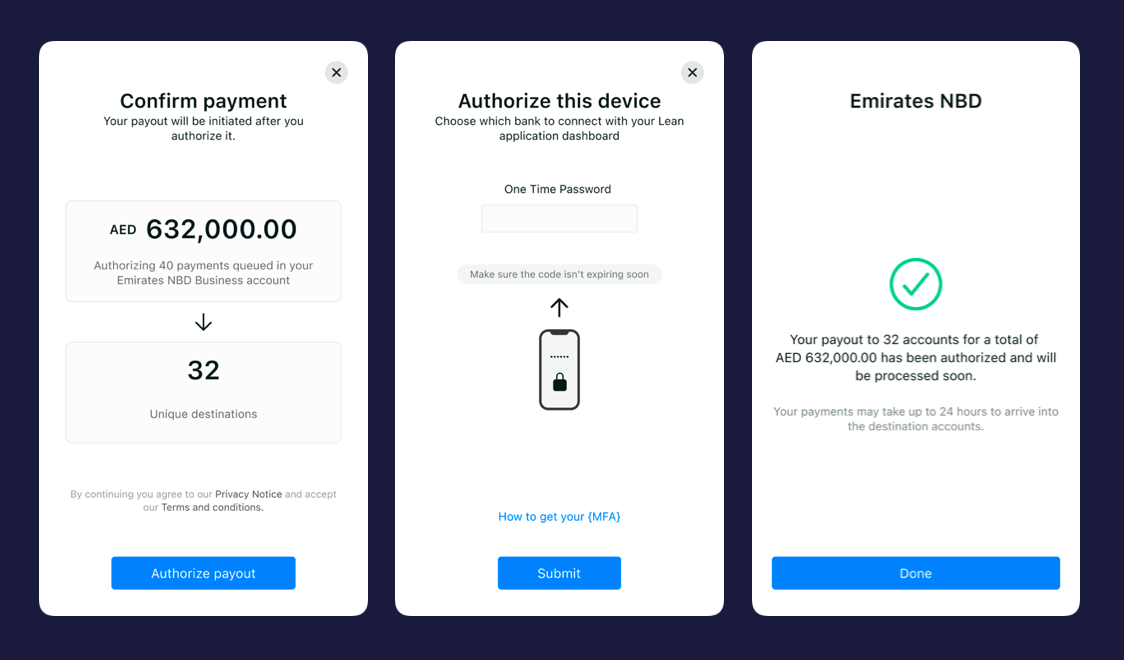
Authorize creation shot
Once an authorization has been completed, you will receive payment.updated web-hook to your Webhook URL.
If you’re authorizing more than 1 payment_intent, you will receive 1 web-hook per payment intent (e.g. 5 web-hooks if you’re authorizing 5 payment intents)
Here is the web-hook format after a successful authorization:
{
  "payload": {
    "id": "7c5bf6fd-8c5a-4c90-959f-17ec9d8b55ad",
    "customer_id": "61c8db3f-a078-4c75-a3a8-954b585ff945",
    "end_user_id": "8a8ad9a7-feb7-41ee-93ce-73cd9572ae7e",
    "intent_id": "88f73a6d-f017-4fc6-85bf-2cc2804c2a4a",
    "status": "ACCEPTED_BY_BANK",
    "amount": 1000,
    "currency": "AED",
    "bank_transaction_reference": "1113108223645493",
  },
  "type": "payment.updated",
  "message": "A payment object has been updated.",
  "timestamp": "2022-08-31T11:09:39.558217432Z",
  "event_id": "963b1b3e-ea0d-4098-beee-fb8262a5689d"
}
Payment authorization can have one retry-able status on the Lean platform:
AUTHORIZATION_FAILED: The bank rejected the payment auhtorization. This could be for a number of reasons such as insufficient balance to complete the transaction, or a connectivity failure. This is retry-able status so the user can try again.
Payment authorization can have three final statuses on the Lean platform:
FAILED: The bank rejected the payment initiation. This could be for a number of reasons such as a connectivity failure, expired MFA or internal bank error. This is final status and you need to queue the payments again.
PENDING_WITH_BANK: The bank accepted the initiation, but didn’t provide a transaction reference number. Pending payments may be processed by the bank at a future date and require manual reconciliation.
ACCEPTED_BY_BANK: The bank accepted the initiation and provided a transaction reference number. Transactions that are ACCEPTED_BY_BANK should not be treated as completed payments until the funds have been reconciled in your account. There are a rare number of circumstances when a delay may occur between a bank accepting a payment and the funds reaching your account and/or circumstances which may cause the payment to fail. For example, a bank may request additional KYC checks or there may be insufficient funds available for the transaction after the bank transfer fees are applied. We recommend that funds are reconciled in your account before making them available to the customer.
Updated 9 months ago
